home picture
home
home luxuri
luxuri
Showing posts with label kids. Show all posts

Thursday, August 12, 2010

Mini Totes {kids craft}

IMG_1230


Throughout the summer we have been trying to stay busy and making a few fun crafts along the way.  This one we made for my girls, sister and nieces to sell to make $ to donate to a charity.  They have a little group they call {K-JAM} and throughout the year they earn money and then donate it to various good causes.  It is so fun to see them get excited about helping other and I am so proud of them!


IMG_1222   IMG_1221   IMG_1220IMG_1232 IMG_1225
This was really so simple and fun for them.  We purchased these small bags 3/$1 at the dollar store and then embellished them with things we had around the house {flowers, jute, burlap, tags and scrapbook supplies, etc.}  We used hot glue and little brads to attach everything to the bags.  The brads worked great because they could go right through the material of the bags.
IMG_1231IMG_1227

They were so happy with how they turned out. 
A fun, quick and simple project!
giveaways

Monday, August 9, 2010

{Girly} Gift Ideas

IMG_1578

Thinking outside the {shirt} box here. This is a simple way to make a birthday girl feel special by presenting her gift in an unique way.  My little sister’s bday was over the weekend and we had some cute PJ’s to give her.  I loved the fun colors (which are her faves) so I let them be my inspiration.

IMG_1563

I had this cute round paper mache box with a lid.  You can find these for not too much $ at craft stores.  I just added a strip of cute scrapbook paper  on the front with Mod Podge. It says, ‘happiness is made to be shared’.

***You could use an oatmeal container or something like that and just cut it down and cover the whole thing in paper. ***

I tied some ribbon around it and attached a little hang tag (which I put some more scrapbook paper on).  I put the lid on the bottom so she would have it just in case she wanted to use the box  later for decor or storage.

IMG_1561

Then, I simply rolled up the clothes and stuck them in the box.

  IMG_1579

Next I made a topper using a variation of Martha’s pom pom balls.  I attached it to a wire stem and stuck it down in the center of the rolled clothes.

IMG_1572 

And, there you have it!

       IMG_1567  IMG_1557 IMG_1571

~~~~~~~~~~~~

Here is another idea using the pom pom balls as money flowers.

IMG_1434

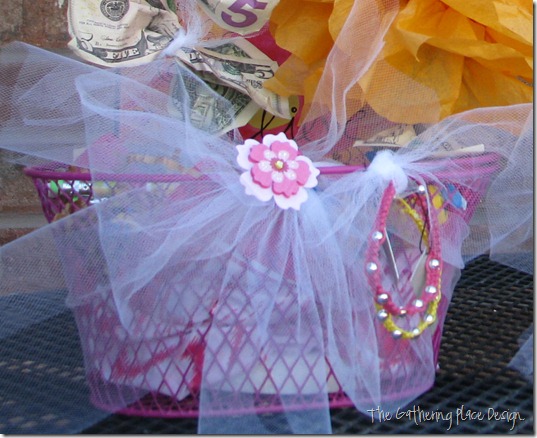
I made the smaller version of the pom poms and attached them to a wire stem using florist tape.  Next, I tied money to the stems like ‘leaves’ with tulle.  I stuck them into florist foam and put it in this cute basket.  I covered the foam with a little bandana and added in tissue, candy and a few small gifts.  You could add whatever you wanted in the basket.  I then embellished it with more tulle and stickers. I made with one for my niece and she was quite pleased. ;)

IMG_1434IMG_1434IMG_1435 

~*Another one for my daughter’s friend.*~

      IMG_1439IMG_1438     IMG_1444                                                

I hope this inspires you to get gift-givin’-creative for the next

birthday girl in your life…

MakingThe Girl Creative The DIY Show Off

Friday, June 4, 2010

“About Me” Books

  How many days until school starts? 


Alrighty folks, it’s only the 4th day of summer vacation and I already feel as if I may lose my mind. ;)  So, it’s time for a plan…Operation: Keep Kids Busy so We Can All Survive and Enjoy the Summer!  I have been harvesting some ideas of fun crafts we can do, because they love it.  Yesterday we had our bestest cousins and aunty over so I thought this project would be a fun one for them. I think I first saw this idea on HGTV.com, but I have seen some really awesome ones around as well. (wish I could remember who, but I can’t. Sorry. If you do though, let us know!)  Ours are pretty basic and these cute girls (ages 4-11) made them all by themselves. :) If you remember I put together a cute quote book for my suitcase I made HERE, so here are the detes…

IMG_1149
We started with 3 basic brown lunch sacks that I had and folded them in half with the bottom flap on the inside.  Try to keep them very even and lined up.


IMG_0769IMG_0770

Next, I got out the never ending supply of scrapbook paper and let them go wild.  (I didn’t realize I had so much, but it sure did come in handy!)  Measure the paper to wear you would like it and cut and paste.  It is fun to do coordinating patterns and mixing and matching.  As you can see above, I glued paper just separately on the flap and underneath for a fun little pocket, but you could just paste right over top as well.

IMG_1133  IMG_1132

Busy girls, crafting away:)  They decided to make “About Me” books, but you can also make little scrapbooks with picture, etc.

IMG_1142 IMG_1139
Once all the pages were complete, I lined them up and made 3 hole punches and tied them with ribbon and jute twine.
IMG_1151IMG_1153  
In the openings of the bags you can insert little notes or pictures like a little ‘pocket’.  This gives you additional space for journaling as well.
IMG_1156 IMG_1155
Here (above) is an example of quotes, and pictures.  I added a tag on the front of mine and below you can see the little hiding flap in action.;)
IMG_1152IMG_1134
 
IMG_1150
Mine needs some pics or something, but hopefully this gives you the idea.

IMG_1157

And here are the sweet girl’s masterpieces!  They had so much fun and were very pleased with what they created.  I really is fun that my girls are getting bigger and can enjoy doing crafts and projects together.  I just need to get my plan in action for the summer!  So, if you have any grand ideas, be sure to send them my way!  I will be posted my ideas along the way too.  Happy Summer! :)

Linking to…


Visit thecsiproject.com

http://shabbynest.blogspot.com/2010/06/frugal-friday.html