


Some years ago, my husband and I recieved the most perfect Christmas present ever. Our first precious baby girl. Yes, my sweet daughter's birthday happens to be on Christmas Eve. This always makes for an even busier time of year. I am ultra sensitive to the fact that I do not want her birthday overshadowed because of the very exciting and important day that follows. We try to keep it as seperate as possible. (which, as you can imagine, is not easy!) Because of this, I may tend to go a bit overboard the other way. (me? never!)
Well, this year she decided she wanted a room makeover! {Project! Yay!} I was so excited and the wheels started turning immediately, but a room re-do the day before Christmas can be a bit overwhelming! Needless to say, this is what I have been working on the past couple weeks. Plus, all the other good and fun Christmas stuff! She chose the colors and picked out a few items, but the reveal was a ginormous suprise. I forgot to take a before picture (dangit) but it was kind of a neglected mix of shabby chic, little girl, baby room and big girl who thinks she's 16 stuff. I'm sure you get the visual.
And now it's a little girl's FUnky GlAm pRinceSs Dorm RoOm! Check it out...

I wanted to keep the cost down as much as possible, so I was pretty creative and thrifty.
We lucked out to have HUGE bedrooms in this house, so fun! Perfect for a little girl who loves to sing and dance constantly and a designers dream! She wanted to have the space in the center open, so we went with a sleeper sofa. I found it on sale for $199 regulary $399. Not bad, not bad. The color was perfect and it is super easy to fold up and down. The pillows I got on sale. The two on the sides on clearance...$3 each! I only had to cover a few squares with the fabric I had purchased for the room. This gave them a real custom look. The white in the middle my Grandmother stitched for her. I just added some tulle to funk it up a bit.


Next, the focal wall. I found this great saying by Judy Garland on etsy from itswrittenonthewall. (She was awesome to work with. Great quality, good price and super fast shipping...check her out) I think every little girl (and big girl) should have this saying on thier wall. I took 4 thrift store frames and painted them all out in white.

I chose frames that all add different ornate details. This gives them a more interesting feminine look. The big one went around the vinyl quote and for the smaller, I covered cardboard with my fabrics. The dots are from TJ Maxx. (gotta love TJ Maxx.)

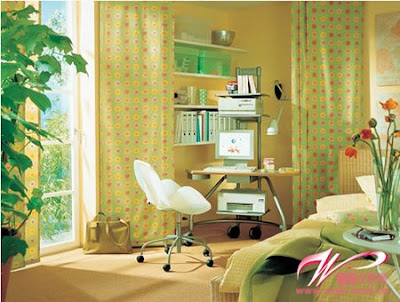
Ok. I love this next part. I have to say though, the pictures do not do it justice. I couldn't get a great picture, but it is so fun. I have always wanted to do something interesting with this little nook in her room. I took a shower curtain tension rod (I already had) and put it between the two walls. I then wrapped 10 yards of each color of tulle around and swooping down. I tied doube ribbons in a few places to both secure and add some more girly-ness.

The curtains are from Big Lots. Tied with the same ribbon.

Hopefully you get the idea. Tucked back in there is a cozy little "chill" area to read or rest or whatever. You'll see a cute little table that I found for $6 at the thrift store and my lamp revamp from Big Lots. Painted the little table and as for the lamp...painted the gold base white, jeweled trim on the shade and voila! A feminine funky reading lamp.


The furniture was my grandmothers so that make it even cooler. It is a deco style...how many different styles have we mixed here? Love eclectic! We painted it all in this crazy pink my daughter picked out and put some mismatched glass knobs on as well. The color ties it in and the knobs give it a the feminine glam feel. I accesorized it with girly stuff. A new jewelry holder, a decorative storage box and glam candles. All on clearance of course! To tie it all in I made a simple runner out of the fabric and covered my aunty's chair as well. Notice the feminine, victorian detail in the chair paired with a comtemporary fabric...and it works! Love that chair! Thanks Pammy :)


For some more "art" on the shelf above I covered cheap canvas with the coordinating fabrics. You could use anything though. I added a few details for interest. Then took my dollar store vases and dropped a pink flower in each. Simply lovely!

 I made this inspirational piece out of dollar store frames and some shelf backing I had leftover. (remember, I hate to throw things away...I might need them! see?) I printed out words to inspire and put them in the frames. Love, believe, dance, sing, play, inspire, authentic, create, grateful...you get the idea. Good reminders to live life and love it. Hopefully she will read them daily. I simply painted out the board, attached the frames with epoxy and hung with ribbon. Two custom "art" pieces to fill big walls...less than $18, including paint. I have to admit I was nervous, but I think they turned out pretty well and you can't beat the price!
I also made her some fun bulletin boards for pictures, cards, etc. out of the fabrics I choice for the room. They were sooo easy and inexpensive to make, but make a big impact in the room as well as function. I don't think they will stay empty for long!


This is my cheap and easy "floral arrangement". (ha ha) Thrift store vase with Christmas beads and dollars store stones. I just layered them in the glass, stuck in these funky Christmas decor wand thingys and tied it with coordinating tulle. { Watch for all the Christmas clearance that you can use in other ways!} The mirror is an old mirror I had in my room growing up that I just tied with coordinating ribbon. Another Christmas garland draped across the dresser. The frame my daughter made. ( she needs to get a picture in it) Notice how I have mixed styles throughout the room. Adding simple things to what you already have can totally change the look. For instance, some of the cottage-y items from her room before I simply added some tulle or fringe and now it's feminine glam. This gives uniqueness and interest. No fear decorating here!

Even the trash can couldn't escape my hot glue gun!

All in all I think it turned out pretty good. The look on my daughters face was priceless and that is all I can ask for! I can't leave anything alone, so there are a few more things I'd like to do in here. Check back. ;) I hope this inspires you to re-use what you have and think outside the box. Again, there is no wrong way to decorate your home. If it makes you feel good, do it! Here are a few more pics. Best wishes for the new year!


I'm sharing...


No comments:
Post a Comment